NOTE – this how-to also applies to FoxClocks on Firefox 56 and below. For Firefox Quantum (57), click here.
Starting FoxClocks
Start FoxClocks by selecting ‘FoxClocks’ from the Tools menu. Alternatively, double-click any statusbar/toolbar clock.
You can also use Ctrl+Shift+Q to open FoxClocks, and Ctrl/Command+W to close it.
Main FoxClocks Window
Zone Picker
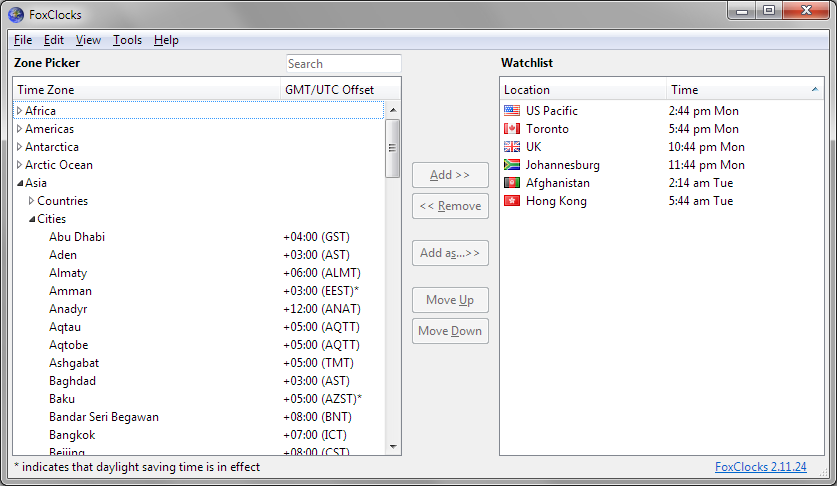
The Zone Picker tree allows you to browse virtually all the world’s time zones by geographic region. (At the moment non-English versions of FoxClocks have a slightly less flexible Zone Picker – we hope to address this soon.) Expand a continent to browse countries or cities in that continent. The Zone Picker also shows each time zone’s current offset from GMT (Greenwich Mean Time). Double-click on a zone for more detailed information.
Note: the Zone Picker contains time zones, rather than locations. The time zone ‘Europe->Cities->Moscow’, for example, is the appropriate time zone for the locations Moscow and St. Petersburg. You could also use the zone ‘Europe->Countries->Russia->Moscow+00 – W Russia’.
Watchlist
The Watchlist shows your selected locations and their current local time. Double-click a location to open its Location Properties window. Use the space bar to show/hide a location’s statusbar/toolbar clock.
The order of the locations in the Watchlist determines the order of your clocks in the statusbar/toolbar. You can change the order using the ‘Move Up’ and ‘Move Down’ buttons, or you by sorting by location name or current local time.
Add/Remove Buttons
Click ‘Add’ to add zone(s) selected in the Zone Picker to your Watchlist. The name of the new location(s) are based on the zone name(s): if you select the zone ‘Asia->Cities->Shanghai’, the location ‘Shanghai’ will be added to the Watchlist.
Click ‘Remove’ to remove the selected location(s) from your Watchlist.
‘Add as…’ Button
Click ‘Add as…’ to add a custom location based on the zone selected in the Zone Picker. The Location Properties window will open, allowing you to customize the location’s name, styling and latitude and longitude (this allows FoxClocks to open the location in Google Earth). For example, you could select the zone ‘Americas->Countries->Canada->Eastern Time->Ontario’, and specify the name ‘Ottawa’ (or ‘Home’). The location ‘Ottawa’ will appear in the Watchlist, and its local time will be calculated according to Canada’s Eastern Time Zone rules.
Move Up/Down Buttons
Use these buttons to customize the order of the Watchlist. The order of the watchlist determines the order of your clocks on the statusbar/toolbar. Alternatively, you can sort by location name or time by clicking on the appropriate column heading in the Watchlist.
Importing/Exporting Settings
You can import and export FoxClocks settings from the ‘File’ menu. This can be useful for configuring FoxClocks for multiple users, or for moving your settings from one computer to another.
Location Properties Window
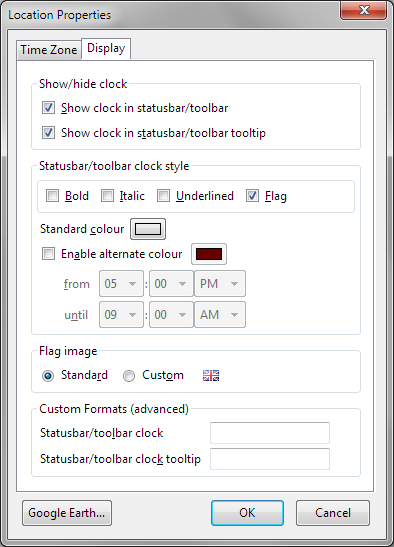
Open the Location Properties window by double-clicking on any location in your Watchlist.

Select this tab to edit the location’s name, latitude and longitude. Latitude and longitude are optional.
Options Window
Open the Options window from the Tools menu in the main FoxClocks window, or by right-clicking on any clocks in your statusbar/toolbar.
Time Format Tab
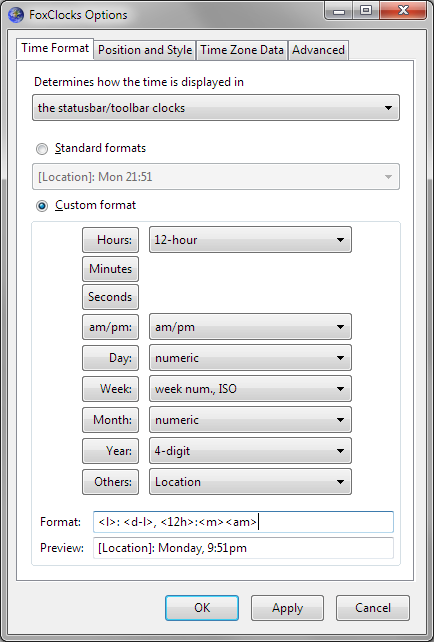
Use this tab to customize your clocks’ formats. You can apply formats to clocks in the main FoxClocks window, clocks in the statusbar/toolbar or clocks in the statusbar/toolbar tooltip.
Standard Formats
Use the standard formats drop-down menu to choose from one of the standard time formats.
Custom Format
If none of the standard time formats are suitable, use the custom format area to create a custom time format. Use the drop-down menus next to each button to add time components (e.g. ‘hours, in 24-hour format’) to your custom format. You will see a preview of your custom format build up as you add each component.
Alternatively, you can edit the format directly in the ‘Format’ box.
It’s worth investigating each drop-down menu to see what’s available – custom formats are very powerful.
Position and Style Tab
Use the ‘Display in’ radio buttons to display your clocks (or the FoxClocks icon) in the statusbar or in a toolbar.
Note: the first time you choose to display your clocks in a toolbar, you must open the ‘Customize Toolbar’ palette by right-clicking on one of the toolbars (e.g. on the ‘Refresh’ button’) and choosing ‘Customize…’; then drag the FoxClocks icon from the palette onto any toolbar.
Use the ‘Display as’ radio buttons to display either multiple clocks or the FoxClocks icon. The icon view can be helpful if you are short of desktop space; hover the mouse over the icon in the statusbar/toolbar to display clocks configured to show in the statusbar/toolbar tooltip.
Time Zone Data Tab
Displays information about the current FoxClocks time zone database, and allows you to configure automatic updates (weekly), or to check for updates manually with the ‘Check now’ button. Also displays current GMT/UTC, as reported by the Operating System; this is useful for diagnosing incorrectly configured system time settings.
Note: automatic updates are enabled by default.
Time Zone Tab
Select this tab to view details about the location’s time zone: the current time, date and GMT offset; Standard GMT offset and, if applicable, Daylight Saving GMT offset and the start and end times of Daylight Saving Time.
Google Earth Button
Click on the Google Earth button to open Google Earth (if it’s installed) at the current location. The button is disabled if latitude/longitude information is not available.
Additional Features
Statusbar/Toolbar Clock Tooltip
Hover the mouse over any clock/the FoxClocks icon in the statusbar/toolbar to display clocks configured to show in the statusbar/toolbar tooltip (use the ‘Display’ tab of the Location Properties window to select whether a clock appears in this tooltip.)
This article is also available in Serbo-Croatian (translation by Anja Skrba from Webhostinggeeks.com), and Slovak (translation by Margareta Sliwka).

